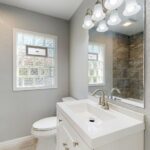
A 1.5 bathroom means you get one full bath with a shower or tub, plus one half bath that has just a sink and toilet. This setup works well if you have guests over, and it helps reduce the morning rush when multiple people need to get ready. The trick is using your limited square footage wisely.
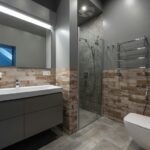
Start with practical layout choices. Pocket doors slide into the wall instead of swinging out, so they take up less room than regular doors. Wall-mounted sinks like IKEA’s Godmorgon ($150–$250) keep the floor clear and make the space feel less cramped. Light paint colors on the walls bounce light around and prevent the room from feeling like a shoebox. Mirrors placed strategically do the same thing, plus they’re useful for actual grooming.
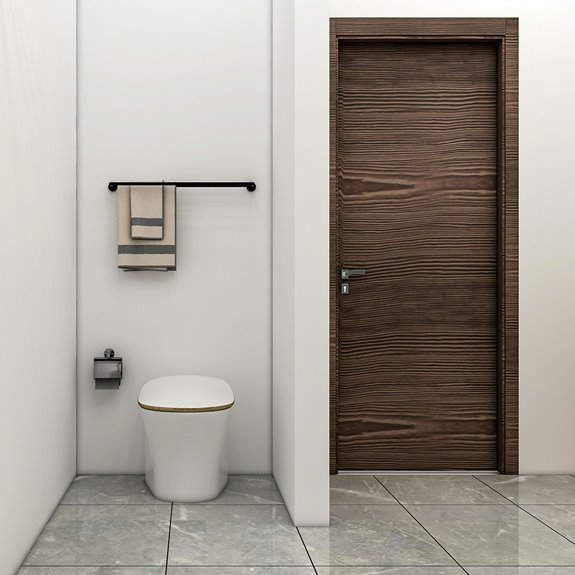
Keep your plumbing where it already is. Moving pipes gets expensive fast, and there’s usually no real benefit to it unless you’re completely gutting the space. Instead, focus on vertical storage with shelves or tall cabinets that climb the walls. Pair your exhaust fan with a window you can actually open. This handles moisture before it causes mold or makes everything feel damp and sticky.
What Exactly Is a 1.5 Bathroom?

Ever wondered what real estate agents mean when they list a home as having 1.5 bathrooms?
You’re looking at one full bathroom—complete with a sink, toilet, and shower or bathtub—plus an additional half bathroom with just a sink and toilet. Two separate groups of fixtures working together in practical ways.
One full bathroom with sink, toilet, and shower or tub, plus a half bathroom with sink and toilet—two separate fixture groups working together practically.
The main perk is that you get your own daily space while guests have their own bathroom nearby. No more awkward morning waits when everyone needs to get ready at the same time. In a busy household with kids, roommates, or just a partner who takes forever with their routine, this setup keeps things running more smoothly.
Space optimization happens naturally because these bathrooms typically use compact, efficient fixtures arranged for easy traffic flow. The layout means people can move through without bumping into each other or waiting around. You’ll notice how this configuration actually adds value to your home and makes daily life feel less cramped.
How a 1.5 Bathroom Differs From Full and Half Baths

So what’s the actual difference between these bathroom types, and why does it matter for your home?
Three main bathroom setups are worth understanding. A full bathroom includes a sink, toilet, shower, and bathtub. A half bathroom has just a sink and toilet. A 1.5 bathroom combines one full bath with one half bath, giving you flexibility that works well for most households.
| Feature | Full Bath | Half Bath | 1.5 Bath |
|---|---|---|---|
| Sink | ✓ | ✓ | ✓ |
| Toilet | ✓ | ✓ | ✓ |
| Shower/Tub | ✓ | ✗ | ✓ |
| Guest-friendly | Limited | ✓ | ✓ |
| Space needed | Most | Least | Moderate |
The 1.5 bathroom setup reduces morning traffic in your home and gives guests their own space without needing a shower or tub. You’re getting shower functionality while keeping a dedicated guest toilet separate from your main bathroom. This matters because it means your kids and partner aren’t waiting around during morning routines, and visitors can use the half bath without walking past someone’s bedroom or taking up your primary shower space.
Why a 1.5 Bathroom Works for Small Homes and Guest Spaces

When you’ve got a small home or regular guests, a 1.5 bathroom setup handles the morning rush pretty well. Instead of everyone crowding around one sink, your guests get their own half bath while you keep your full bathroom private. That means fewer people waiting in line and less awkwardness when friends stop by. You’re also making smart use of your square footage—you’re not wasting space on something you don’t need, but you’re still giving yourself and visitors real convenience.
Space Efficiency and Flow
Why does a 1.5 bathroom setup work so well in smaller homes? Smart choices about fixtures and layout let you get the most out of every square foot. You don’t have to give up how well things work—you just have to plan carefully.
| Design Feature | Benefit | Example | Impact |
|---|---|---|---|
| Pocket doors | Saves swing space | Separates half bath | Opens up hallways |
| Wall-mounted sinks | Creates visual openness | Floating vanity | Feels larger instantly |
| Light colors | Reflects light naturally | Pale tiles/paint | Reduces cramped feeling |
| Vertical storage | Utilizes unused space | Shelving above toilet | Keeps clutter hidden |
Pocket doors slide into the wall instead of swinging out, so they don’t eat up floor space. A floating vanity (think the IKEA Godmorgon at around $100-150) mounted on the wall does the same thing—your eyes see more floor, and the whole room feels bigger. Light-colored tiles and paint actually bounce light around the room, which helps it feel less crowded. Shelving above the toilet or on empty wall space keeps things off the counter, so you’re not staring at clutter when you’re trying to relax.
Your guests also benefit from a well-placed half bath. When visitors don’t have to walk through bedrooms or private areas to use the bathroom, everyone feels more comfortable. Good door placement and clear paths through your home mean people can move around without bumping into walls or furniture. That kind of smart planning is what separates a small home that feels cramped from one that actually lives well.
Guest Convenience and Privacy
When someone’s waiting for the bathroom and someone else is in a rush, awkwardness fills the air. A half bathroom fixes that problem. Adding a second toilet and sink in a convenient spot—near your entryway or living room works well—gives guests their own space without them needing to walk through your private areas.
Your visitors can freshen up without you managing bathroom traffic or worrying about them accidentally wandering past your bedroom. They get privacy and independence. You get peace of mind knowing your family’s routines stay separate from guest needs. Everyone feels more relaxed because nobody’s bumping into each other or waiting in line. That’s what happens when you plan bathrooms thoughtfully.
Reducing Morning Bathroom Conflicts
How do you stop the morning bathroom rush from turning into a family standoff? A 1.5 bathroom setup gives you the answer. With a full bathroom plus a separate half bath, you’re cutting wait times dramatically because your family members aren’t all competing for the same sink and shower anymore. One person showers in the full bathroom while another brushes teeth at the half bath. This simple split reduces frustration and keeps mornings running smoothly.
The practical benefit here is real. You’ll notice fewer conflicts over mirror time and counter space. It’s not excessive—you get genuine relief from daily congestion without adding unnecessary square footage. If you’ve ever had two people stuck in one bathroom before school, you know how quickly things get tense. A half bath costs between $3,000 and $8,000 to install, depending on your area and whether you’re adding plumbing to an existing space. For many families, that’s worth the peace of mind alone. Your home feels more spacious and less chaotic for everyone sharing it.
Set Your Budget: What a 1.5 Bathroom Remodel Actually Costs

What’s the real price tag on fixing up your 1.5 bathroom. Labor costs usually take the biggest chunk of your money, so it helps to know where you can cut corners. The smartest move is keeping your plumbing where it already is—moving pipes and fixtures around will drain your wallet fast. Your bathroom size matters too. An 18–25 square foot space gives you that sweet spot between being affordable and having enough room to move around.
You can save serious money by doing some work yourself. Demolition, flooring, putting in a new vanity, replacing the toilet, adding lights, trim work, and painting are all doable DIY jobs if you’re willing to put in the effort. Calling in professionals for plumbing or electrical work will bump up your costs, and moving fixtures like toilets or adding new drain lines puts you into near-new-bathroom price territory.
Here’s the honest truth: leave things where they are, work within your bathroom’s current footprint, and your dollars will go further while still giving you real improvements.
Ventilation and Moisture Control Before You Design

Before you pick out new tiles or decide where your vanity goes, you’ll want to nail down your ventilation strategy. Here’s the thing: a 1.5 bathroom’s full tub or shower creates serious moisture, and without proper airflow, mold will move into your walls and shared spaces pretty quickly.
Start by sizing an exhaust fan to your bathroom’s volume, measured in CFM (cubic feet per minute). The math is straightforward—multiply your bathroom’s length by width by height, then divide by 60. A 40-square-foot bathroom that’s 8 feet tall needs roughly a 50 CFM fan to do the job. A humidity-sensing fan works well because it kicks on automatically when moisture rises and shuts off when things dry out. Models like the Panasonic WhisperCeiling (around $100-150) sense humidity without you having to think about it.
Pair your exhaust fan with an operable window whenever possible. Fresh air exchange from outside actually matters more than you’d think. Then commit to regular maintenance: clean vents and fans quarterly. Dust buildup reduces how well fans work, and that’s when moisture starts causing real damage to your fixtures and drywall.
Maximize a 1.5 Bathroom Layout: Open vs. Zoned Spaces

When you’re working with a 1.5-bathroom setup, you basically have two paths forward. An open-space approach uses light colors, large mirrors, and minimal barriers to make your bathrooms feel roomier and brighter. A zoned layout, on the other hand, separates your wet areas (toilet and shower) from your dry areas (vanity and storage) to create better organization and smoother traffic flow.
Your best choice depends on what bothers you most. If your bathrooms are cramped and you want them to feel less claustrophobic, the open approach works well. Think pale gray or soft white paint on the walls, a large frameless mirror (like the Decor Wonderland 36-inch round mirror at around $80), and good lighting from recessed fixtures or LED strips. If you find yourself bumping into people or struggling to find space for your stuff, zoned spaces are worth the effort. You can use partial walls, glass dividers, or even just strategic furniture placement to keep different functions separate without making everything feel cramped.
Location matters more than you’d think. Put your half bath near your living areas, kitchen, or guest spaces so visitors don’t need to wander through your whole house. Your full bathroom should sit near the bedrooms to cut down on morning traffic jams. This simple choice prevents the awkward situation where three people need the bathroom at once and there’s nowhere else to go.
Open Floor Plan Benefits
A small bathroom feels bigger when you remove walls or swap traditional doors for pocket doors that slide into the wall. This simple change lets you see more of the space at once, and those tight 15–25 square feet suddenly feel less cramped.
Light colors on your walls, a large mirror, and natural light from a window or skylight make the room feel even more open. When your sink area and bathtub aren’t separated by walls, the space flows together naturally while still keeping separate zones for different tasks.
Wall-mounted sinks and compact toilets free up floor space that would otherwise feel cluttered. Vertical storage solutions and recessed cabinets keep your stuff organized without taking up square footage. Clear pathways throughout the room mean you won’t bump into awkward door swings or squeeze through tight corners anymore.
Zoned Space Functionality
How can you make a 1.5 bathroom work harder without feeling cramped? Bathroom zoning is your answer. Split your full bath—with shower, tub, sink, and toilet—from your half bath featuring just a sink and toilet. This smart split reduces cross-traffic and improves how guests move through your home.
Position your full bath near bedrooms for privacy while placing the half bath closer to living areas. You’re creating distinct zones that serve different purposes. Pocket doors or outswing doors prevent awkward door swings from blocking walkways, which keeps your usable floor space open. Home Depot and Lowe’s carry pocket door kits starting around $30 to $100, depending on the material and finish you pick.
Wall-mounted fixtures and vertical storage work in each zone to keep floors clear and organized. Consider wall-mounted vanities like the Kohler Bancroft ($400–$600) or simpler options from IKEA’s GODMORGON line ($150–$250). These options take up less room than traditional pedestal sinks.
Use lighting and color to reinforce the zones naturally. Lighter hues in the guest area and warmer tones in your private bath signal that these spaces serve different purposes. LED strip lights ($15–$40 from hardware stores) can highlight shelving and create distinct moods without eating up real estate on your walls.
Traffic Flow Optimization
Think of your 1.5 bathroom setup like managing traffic on two lanes. One lane handles your family’s everyday needs, while the other serves your guests. You’ll want to place these spaces in different parts of your home to avoid awkward situations where people cross paths unexpectedly.
In open floor plans, put your half bath near the entry or living room so visitors don’t need to walk through bedrooms to find it. Your full bath should sit closer to the bedrooms for convenient morning routines. If your home has more defined zones, tuck the full bath along a private wall with direct bedroom access. Keep the half bath easy to find and reach from your main living areas.
Location Strategy by Layout Type
Open floor plans work best when pocket doors lead to the half bath in your entry hall, and the full bath sits near bedrooms. This reduces traffic flow issues since people aren’t constantly crossing through shared spaces.
Zoned layouts benefit from placing the half bath in the living area with outswing doors that save floor space, while the full bath stays private along a wall near sleeping areas. This separation keeps your family’s private routines separate from guest areas.
If you’re combining both spaces or focusing on guest convenience, keep the half bath prominent and visible. Position your full bath as a secondary option to handle overflow when you have visitors. Pocket doors work well here since they don’t swing into walkways and create bottlenecks.
For homes where family routines matter most, place the full bath centrally near bedrooms with outswing doors, and tuck the half bath in a less visible spot. This setup keeps morning and evening routines efficient without guests wandering into family zones.
Space-Saving Fixtures for 1.5 Bathrooms That Feel Full-Sized

What’s the secret to making a 1.5 bathroom feel spacious instead of cramped? Space-saving fixtures. They’re helpful tools for keeping your bathroom functional without eating up floor space.
Consider these smart upgrades:
Wall-mounted sinks free precious floor area and create an airy feel. Models like the Kohler Bancroft (around $200-300) or the IKEA Godmorgon ($150-250) sit high on the wall, leaving the floor open underneath. Compact toilets maintain full functionality while shrinking your footprint. The American Standard Cadet 3 (roughly $300-400) runs narrower than standard models without sacrificing comfort. Wall-mounted vanities maximize vertical storage without crowding the room, and recessed shelves above the toilet add storage zones without blocking movement. Streamlined glass shower enclosures visually expand the room by letting you see through to the back wall instead of hitting a solid barrier.
You’ll notice how these fixtures work together. Wall-mounted sinks pair perfectly with compact toilets, creating breathing room. Floating vanities offer storage without that boxed-in feeling. When you combine these elements strategically, your 1.5 bathroom becomes genuinely spacious and well-thought-out. It doesn’t just function—it feels like you’ve made the most of every inch.
Smart Door Solutions: Pocket Doors vs. Swing Doors

When you’re working with a compact 1.5-bathroom layout, your door choice matters because it affects how much usable space you actually have. Pocket doors slide into the wall instead of swinging out, so you’re not losing floor space to that wide arc a regular door needs—really helpful when a toilet or sink sits nearby. The trade-off is real though: swing doors cost less to install and are simpler to set up, while pocket doors require more remodeling work and expense. You’ll need to decide if that extra room to move around in is worth the higher upfront cost and installation complexity.
Pocket Door Space Efficiency
How’d you like to reclaim precious floor space in your 1.5 bathroom without sacrificing function? Pocket doors slide into wall cavities instead of swinging outward, which means you get back real square footage in tight layouts.
Benefits you’ll notice:
- Frees up floor space for better traffic flow and easier movement
- Increases knee and fixture clearance near sinks and toilets
- Eliminates door swing interference in cramped areas
- Improves accessibility when multiple people use the bathroom
- Allows better furniture and fixture placement
Installation does require framing work and professional carpentry, so factor that into your budget. You’ll also need to plan around wiring and plumbing carefully. Modern hardware like soft-close mechanisms and magnetic latches (typically $50–150 per door) add comfort and prevent slamming. The main trade-off is limited wall storage since the door slides into the wall cavity itself.
For small bathrooms needing every inch, pocket doors genuinely deliver. Johnson Hardware and Pocket Door Company both offer standard kits in the $100–300 range. Just know that you’ll want a contractor who’s handled these before—they’re straightforward once you understand the framing, but mistakes get expensive.
Swing Door Layout Challenges
Why do so many 1.5 bathrooms feel cramped the moment you open the door? Swing doors are often the culprit. When you swing a door inward, it uses up precious floor space and creates interference with your vanity and toilet placement. You end up navigating around an open door just to move around the room.
A traditional swing door in a half bath layout forces you to position fixtures awkwardly. You can’t place your sink or toilet where you’d naturally want them without risking a collision with the door. This constraint makes your already tight space feel even smaller and less functional.
That’s why many homeowners are switching to pocket doors instead. They slide into the wall, leaving your floor completely open. Your half bath suddenly feels more usable and comfortable. A pocket door kit typically runs between $100 and $300, depending on the door material and hardware quality. Installation usually takes a few hours if you’re handy, or you can hire a pro for around $200 to $400 in labor costs. The trade-off is worth it when you’re working with limited square footage. You’ll notice the difference the first time you walk in and don’t have to dodge the door swing.
Storage Without Clutter: Vertical Zones and Hidden Solutions

Ever notice how a 1.5 bathroom can feel either spacious or cramped depending on where you put things? You’ll get a lot more room to breathe by thinking vertically instead of horizontally. Wall-mounted cabinets and recessed medicine cabinets keep your floor clear and your daily essentials organized.
Here are some smart storage strategies that actually work:
- High shelves for seasonal items you don’t need daily
- Mirrored cabinets at eye-level for convenient access to everyday stuff
- Over-toilet storage that uses wall space you’re probably not using anyway
- Shallow, recessed options that keep things looking clean and simple
You’re creating zones that match how you actually live. Vertical storage means you’re not picking between having things organized or having your bathroom look nice—you get both. Your bathroom stays functional, easy to use, and genuinely livable without looking like a closet crammed full of supplies.
Color and Lighting Choices for a Larger-Feeling Space

Once you’ve sorted out your storage, it’s time to think about color and lighting—the two things that actually make a small bathroom feel bigger. A lighter color palette opens things up right away. Think soft whites, pale grays, or creamy beiges. If you want something a bit warmer, try light taupe or pale blue. Darker colors can work too if you’re into that look, but they’ll make the space feel cozier and smaller, so keep them as accents rather than main colors.
Your lighting plan matters just as much as your paint choice. You need multiple light sources working together. Start with overhead ambient lighting so the whole room gets basic illumination. Add task lighting right by your mirror—this is where you actually look at yourself, so it needs to be bright and even. Then throw in some accent lighting to get rid of shadows in corners. A simple option is a basic LED strip light like the Sunco Lighting Super Bright LED Strip (around $15-25) that sticks under cabinets or shelving.
Natural light is your friend whenever you can get it. If you have a window or can add a skylight, those make a huge difference. Large mirrors are essential too. They bounce light around the room and make everything feel more open. A big mirror over your sink, like a 24-by-36-inch frameless mirror (usually $40-80), works well without taking up much visual space.
When you pick lighter colors and plan your lighting thoughtfully, your bathroom will feel noticeably bigger than it actually is.
Design Styles That Actually Work in Compact Bathrooms

With a 1.5-bath setup, you have three solid design directions to choose from. Each one actually works with your space instead of fighting against it.
The modern minimalist approach uses wall-mounted sinks and toilets that free up floor space. Think clean lines, neutral colors, and storage that hides away clutter. Floating vanities like the IKEA GODMORGON ($150-250) give you that open feeling without eating up square footage. Pair it with simple chrome or matte black fixtures, and your bathroom feels bigger than it actually is.
If you prefer warmth over sleekness, traditional cozy charm brings in wood tones and soft textures. A wooden vanity with brass hardware, plush towels in cream or sage, and maybe a small wooden shelf for plants creates an inviting vibe. These materials feel welcoming without demanding a lot of visual attention, so the room stays calm rather than cluttered.
A spa-like retreat centers on natural materials and muted colors like soft greens, warm grays, and off-whites. Stone accents, wooden elements, and good lighting help you relax during your morning routine or evening wind-down. You don’t need expensive fixtures for this approach. Even budget-friendly additions like a simple stone soap dish ($15-25) or eucalyptus plants ($10-15) shift the whole mood.
The key is picking one direction and sticking with it. Mixing all three styles tends to make smaller bathrooms feel scattered. Once you choose your approach, every piece you add—from your towel hooks to your mirror frame—works together instead of competing for attention.
Modern Minimalist Approach
How’d you like to make your cramped bathroom actually feel spacious without knocking down walls? A minimalist approach does this by keeping things simple and uncluttered.
Wall-mounted sinks free up floor space and create visual lightness. They’re available at most big-box stores for $150 to $400, depending on style and materials. Compact toilets fit snugly into tight corners without sacrificing how well they work. Frameless mirrors amplify depth and brightness throughout the room because they don’t create visual boundaries.
Recessed storage hides clutter while maintaining clean lines. You can install shelving units inside your walls or use floating shelves mounted directly above the toilet or sink. Neutral palettes with subtle contrasts—think soft grays, whites, and warm beiges—establish an airy mood without feeling sterile.
Strategic lighting matters more than you’d think in a small bathroom. Both ambient lighting (overhead fixtures that spread light evenly) and task-focused lighting (around mirrors) eliminate shadows that make spaces feel cramped. LED strips behind mirrors run $20 to $60 and create a soft glow that makes the room feel bigger.
The result is a bathroom that feels calm and open. Your 1.5 bath becomes a place where you actually want to spend time, and it’ll genuinely feel larger than it is because every element serves a purpose. Nothing clutters the space or distracts the eye.
Traditional Cozy Charm
If minimalism feels too cold for your taste, there’s another way to make your 1.5 bathroom feel both spacious and inviting. Wood tones, soft neutrals, and classic fixtures create warmth without the stark feeling. Subway tile and beadboard wainscoting add traditional charm to compact spaces without making them feel cramped.
A small-scale vanity with a curved front or pedestal sink preserves the knee space you need. Popular options include the Kohler Bancroft pedestal sink (around $200-300) or budget-friendly versions from IKEA starting near $100. For lighting, layer a ceiling fixture with vanity lights on either side of your mirror and use warm bulbs—something in the 2700K color temperature range makes everything feel cozier.
Texture matters more than you might think. Hand towels, woven baskets, and a few potted plants add visual interest without cluttering surfaces. Simple brass or matte-black hardware finishes the look cleanly. This approach gives you a bathroom that feels welcoming and stays timeless, which beats chasing trendy looks that fade fast.
Spa-Like Retreat Aesthetics
Why settle for a bathroom that just works when you can create one that actually feels good to be in?
A 1.5 bathroom can feel like a spa retreat if you’re smart about how you use every inch. Start with soft, neutral colors like creams, grays, or whites. These shades naturally make you feel calmer without any special effort.
Wall-mounted fixtures and storage are your biggest space-savers here. Instead of a bulky vanity on legs, go for a floating version with recessed storage underneath. This keeps your floor clear and makes the room feel less cramped. Look for options in the $300-$600 range from brands like Kohler or Wayfair.
Large mirrors and glass shower enclosures visually stretch your space. A mirror that runs most of the width of your vanity costs around $100-$250 and actually makes a noticeable difference in how big the room feels.
Lighting matters more than you’d think. You need three types: soft background lighting for relaxing, bright task lighting above the vanity for getting ready, and maybe a small accent light if you have a corner for greenery. LED strips behind mirrors work well and cost $30-$80.
Choose large-format porcelain tiles (usually 12×24 inches or bigger) in matte finishes. They’re easier to keep clean than smaller tiles, and matte metallic fixtures like faucets and towel bars give that upscale feel without looking overly shiny. Budget around $200-$400 for tile if you’re doing a accent wall or floor.
Add plush towels and a woven basket or two for storing supplies. These cost $15-$40 per towel and $25-$60 per basket. A few potted plants near the window, if you have one, round out the look without requiring much maintenance.
Step-by-Step Remodel Sequence to Keep Projects on Track

When you’re tackling a 1.5 bathroom remodel, the order you choose matters more than you’d think. It’s basically the difference between a smooth weekend project and one that stretches into next month.
Start with demolition, then move to flooring prep so you’ve got a clean slate. Next, install your vanity and sink while keeping your plumbing layout intact to avoid costly relocations. Then tackle the toilet, followed by lighting and exhaust fans. Finish with trim, paint, caulk, and accessories.
| Phase | Task | Timeline |
|---|---|---|
| 1 | Demo & Prep | Day 1 |
| 2 | Flooring | Day 1-2 |
| 3 | Fixtures | Day 2-3 |
| 4 | Electrical | Day 3 |
| 5 | Finishing | Day 4 |
The key is respecting your existing plumbing layout. Most half baths have their water lines running where they do for a reason, and moving them costs money and time you probably don’t want to spend. A basic vanity with sink runs anywhere from $150 to $400, and simple toilet models fall in the $200 to $300 range. LED vanity lights are affordable too—usually $50 to $150—and they use less energy than older fixtures.
This sequence keeps your project organized and your wallet happy.
Will a 1.5 Bath Boost Your Home’s Resale Value?

A 1.5 bathroom can make your home more appealing to buyers, though the actual boost to your resale value depends on where you live and what bathrooms you already have. Most real estate experts point to a potential 5–10% value increase in the right situation. That extra half bath becomes genuinely useful when buyers imagine less chaos during morning routines and having a separate space for guests.
A half bath boosts resale value by 5–10% when positioned right, making your home more appealing to buyers seeking less morning chaos.
What actually matters when it comes to value:
- Location of the bathroom — Position that half bath where guests can reach it without walking through private areas of your home
- How intentional it feels — A half bath that seems planned and useful adds value. One that feels squeezed into a corner does the opposite
- Smart placement reduces bottlenecks when the whole family is getting ready at the same time
- Space-saving fixtures like corner sinks or wall-mounted toilets keep things practical without eating into your budget
- Your neighborhood’s expectations shape whether buyers will actually notice or care
The practical reality: you’re offering something that makes daily life easier without spending a fortune on major renovations. Compact fixtures like the American Standard Cadet 3 toilet (around $200–300) or a pedestal sink from Kohler (typically $150–400) deliver solid functionality at reasonable prices. These aren’t flashy upgrades, but they work.
Common 1.5 Bathroom Design Mistakes to Avoid

Just how many design choices can you actually mess up in a space that’s barely bigger than a closet? More than you’d think, honestly.
Your half bath layout determines everything. Cramped door swings and tight knee space kill usability—measure twice, plan once. Avoid positioning your half bath directly off primary bedrooms; guests and family appreciate privacy. Poor planning reduces traffic flow, so make sure you have adequate clearance before you install anything.
Dark finishes without natural light create a cramped feeling. Stick with light colors and reflective surfaces instead. A white or cream-colored vanity paired with a light gray wall does wonders in tight spaces without costing much.
Non-wall-mounted sinks complicate cleaning and waste precious square footage. Wall-mounted options like the KOHLER Bancroft (around $300–400) keep the floor visible and make the room feel bigger. They’re also easier to clean underneath, which matters when you’re dealing with limited space.
Storage transforms function. Neglecting vertical solutions or recessed shelving leaves clutter everywhere. A recessed medicine cabinet (usually $150–300) fits flush into the wall, or you can add a tall corner shelf unit that doesn’t eat into floor space. Even a narrow floating shelf above the toilet stores towels and small items without taking up real estate.
Mismatched fixture heights disrupt how the space looks visually. Install wall-mounted sinks and keep your mirror and lighting at consistent heights. This creates visual balance in a small room and makes it feel intentional rather than like things were just squeezed in wherever they fit.
Your Pre-Remodel Checklist: Inspections and Next Steps

Before you tear out anything or spend a dime on new fixtures, find out exactly what you’re working with. A professional inspection reveals your plumbing layout, electrical capacity, and ventilation before your remodel plan moves forward. You’ll avoid costly surprises down the road.
Your pre-remodel checklist should include:
- Professional plumbing and electrical inspections
- Local code requirements for clearances and dimensions
- Assessment of which fixtures to keep or relocate
- Budget and timeline development
- Storage and layout optimization strategies
Start by confirming door swing clearances and minimum dimensions with your local building department. This step matters because bathrooms have specific rules about how much space you need. Next, figure out whether moving plumbing makes sense financially. Moving pipes costs real money, so sometimes keeping them where they are saves you hundreds of dollars.
Map out your fixture locations on paper first. Sketch where your sink, toilet, and shower will go. This groundwork turns vague ideas into actionable steps and keeps your 1.5 bath remodel on track and within budget.