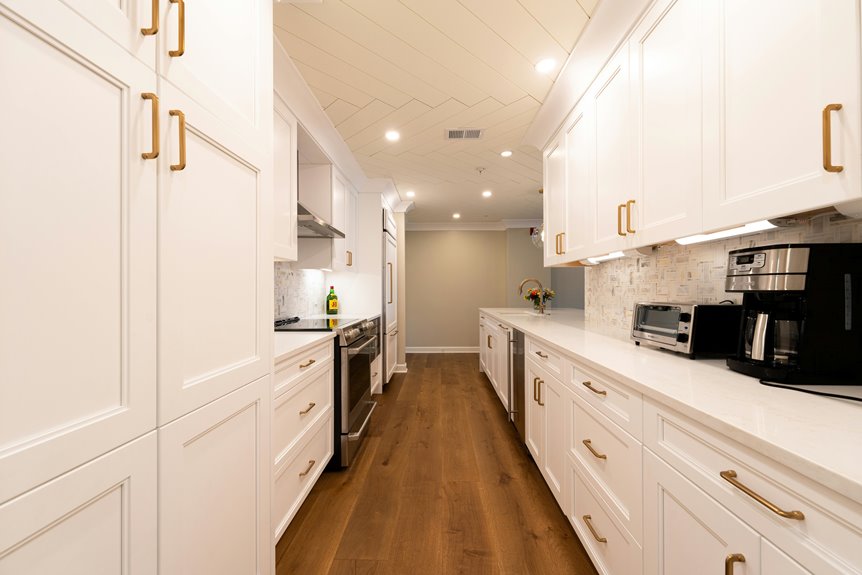
A galley kitchen has two rows of cabinets facing each other across a narrow space. This layout actually works well because everything you need—your fridge, sink, and stove—sits within arm’s reach. You’re not walking back and forth like you would in a bigger kitchen, which means cooking happens faster.
Light colors help a lot. Try pale cabinets paired with reflective subway tiles on the walls. Under-cabinet LED strips, which run about $30–$60, brighten the workspace and make the whole room feel less like a hallway. Layered lighting from multiple sources beats relying on one overhead light.
Storage gets tight in galley kitchens, so pull-out organizers ($80–$200) become your friends. They slide out so you can actually see what’s in the back of your cabinets instead of just shoving things in and hoping for the best. Drawer dividers and tiered shelf risers do similar work without much cost.
Keeping materials consistent matters more in smaller spaces. Stick with a few finishes rather than mixing five different styles. The same goes for clutter—a galley kitchen with stuff piled on counters feels suffocating, but the same space stays open and usable when you keep surfaces clear. It’s not about being perfect; it’s just about not letting things pile up.
What Defines a Galley Kitchen and Why It Works?

Ever wonder why some kitchens feel so efficient despite their tight squeeze? A galley layout features two parallel lines of cabinets facing each other, creating a compact workspace that actually works well. Your sink, stove, and refrigerator sit close together—what designers call a work triangle—so you’re never walking across the room to grab something.
This narrow space might seem limiting at first. But it forces you to plan smart. You can optimize storage by using every inch strategically, keeping frequently used items within arm’s reach. A pull-out spice rack near your stove (brands like Rev-A-Shelf run $40-$100) keeps cooking essentials handy. Slim drawer organizers in the $15-$30 range help maximize cabinet space without wasting any room.
The design also contains cooking mess and odors, which means your living room stays cleaner and fresher. Whether you’re reheating leftovers or preparing a full meal, this galley approach keeps everything you need nearby, making cooking feel less like a chore and more like second nature.
The Galley Kitchen Layout: Maximizing the Work Triangle

A narrow kitchen doesn’t have to feel cramped. The secret is arranging your sink, stove, and refrigerator in a smart triangle pattern that keeps you moving efficiently. Start by placing your refrigerator at one end of the galley as a natural anchor point. Panel-front refrigerators like the LG LRMVS3006S (around $2,500) blend right into your cabinetry instead of standing out, which makes the whole space feel more intentional.
Make sure your aisle width hits at least 42 inches so two people can actually pass each other without doing an awkward kitchen dance. Run countertops along both walls to give yourself plenty of prep space. When you separate your prep area from your cooking station—keeping them in different spots—you reduce the crowding that makes narrow kitchens feel chaotic. This setup means fewer steps wasted and more time actually cooking instead of shuffling around.
Even though a galley kitchen is narrow, it works well because everything sits within arm’s reach. Your workflow becomes natural and quick. That’s what makes a galley kitchen an actual advantage rather than a limitation.
Light Colors and Reflective Surfaces Expand Small Spaces

When you’re working in a narrow galley kitchen, light-colored cabinets and countertops actually do make the space feel bigger and brighter than dark finishes. The reason is simple: light bounces around more easily, while dark colors seem to absorb it and make tight areas feel even tighter.
A glossy backsplash or glass accents behind your counters are worth considering because they bounce light around and reduce shadows. You might look at options like subway tile with a glossy finish (usually $8-15 per square foot) or simple glass panels, which tend to run $20-40 per square foot depending on the style.
Soft whites, creams, and light grays paired with reflective materials work well together. If you’re picking cabinets, brands like IKEA offer light finishes starting around $60-150 per linear foot, while custom options can cost more. For countertops, laminate in light colors runs $20-50 per square foot and reflects decent light, though quartz ($50-120 per square foot) gives you that reflective quality and is more durable if you cook a lot.
The key is that these choices work together. One reflective backsplash alone won’t do much if everything else is dark, but combining light cabinets, pale countertops, and shiny surfaces means light keeps bouncing around the space when you’re actually cooking.
Choosing Bright Cabinet Finishes
Designers recommend light-colored cabinets for galley kitchens because they actually work. White or pale finishes bounce light around your narrow space, making it feel larger and less cramped. When you add reflective surfaces like glossy backsplash tiles or a subtle mirror accent, you’re spreading light to corners that would otherwise feel dark and tunnel-like.
Here’s why this matters: dark cabinets soak up light and feel heavy, while light colors do the opposite. Pair pale cabinets with matching countertops—quartz or marble-look options run between $40 and $150 per square foot—and you get a cohesive look that doesn’t chop up your limited square footage. The space feels open without you having to do much beyond choosing the right colors.
If you want to keep costs down, consider painting existing cabinets instead of replacing them. A quality cabinet paint like Benjamin Moore Advance ($40-60 per gallon) holds up well in kitchens and comes in soft whites and pale creams that still bounce light around the room. You’ll notice the difference pretty quickly once everything’s painted and dried.
Reflective Backsplash and Countertop Materials
Once you’ve picked pale cabinets, your backsplash and countertops need to pull their weight in a galley kitchen. The right materials actually make narrow spaces feel wider, which is helpful since you’re working with limited room.
A shiny backsplash bounces light all around, and light-colored countertops add brightness too. Glossy subway tiles work well for this—they reflect light naturally without looking fussy. Pair them with quartz or marble-look countertops, and you’ve got a combo that feels put-together without the clutter.
| Material | What It Does | Where to Use It |
|---|---|---|
| Glossy subway tile | Reflects light | Backsplash |
| Quartz countertop | Lasts long and stays bright | Work surface |
| White cabinetry | Opens up the space | Everything |
The real trick is keeping your light shades in sync. When your backsplash, countertops, and cabinets all work as a team, you’re creating a smooth, open feeling that actually makes your galley kitchen comfortable to cook in.
Strategic Lighting to Eliminate the Tunnel Effect

A galley kitchen feels narrow because light bounces around unevenly, leaving some spots bright and others dim. You can fix this by using multiple light sources that work together.
Start with under-cabinet LEDs along your countertops. These cost between $20–$60 per fixture and light up your work surface so you can actually see what you’re chopping. Add recessed ceiling lights spaced evenly overhead for general brightness, then hang slim pendant fixtures above your main prep areas. This three-layer approach prevents those dark corners where shadows pool.
Natural light matters just as much as artificial light. If your kitchen has a window or glass door at either end, open things up by keeping them clear. No window available. A glass-panel cabinet door or a light-colored shade that lets sunlight through does the job nearly as well.
Here’s the detail people skip: match your color temperature across all fixtures. Aim for 2700K to 3500K (that warm-to-neutral range). If one fixture is cool white and another is warm yellow, your kitchen looks choppy and disconnected. Check the packaging before you buy—it’ll say the Kelvin temperature right there. Picking the same temperature throughout makes everything feel balanced and purposeful without extra effort.
Layered Lighting Solutions
How’s your galley kitchen looking when the sun goes down. That’s when layered lighting becomes your best friend. You’ll want to combine three types of lighting to banish shadows and create an inviting space.
Under-cabinet lighting uses LED strips to illuminate your countertops and eliminate those dark work zones where you can’t see what you’re chopping. Brands like Task Lighting and Brilliant Evolution offer affordable options in the $25-$60 range that stick right under your cabinets.
Task lighting means focused overhead lights that help you prep food safely and comfortably. Recessed lights or pendant fixtures work well here, depending on your ceiling height and style preference.
Ambient lighting fills the entire space evenly with softer background illumination. This is your general brightness layer that makes the room feel less cramped and more welcoming.
Accent lighting comes from decorative sconces or statement pendants that add personality and depth to the space. Think of these as the finishing touch rather than the main event.
Each type serves a real purpose. Under-cabinet LED strips reduce countertop shadows while overhead lights provide general brightness. When you blend these together, your galley kitchen becomes a warm, functional space where you actually enjoy spending time. The combination works because you’re covering all the zones—work surfaces, general areas, and visual interest—rather than relying on one light source to do everything.
Natural Light Enhancement
While layered lighting sets the mood, natural light really does the heavy work in a galley kitchen. Instead of feeling like a tunnel, your space becomes somewhere you actually want to spend time. Start by keeping your windows clear and unobstructed. Let daylight in without clutter blocking the view.
If your kitchen doesn’t have many windows, glass doors or interior pass-throughs can pull daylight deeper into the space. These openings brighten things up without the cost of a full renovation. You’re basically borrowing light from other rooms, which costs nothing but a little planning.
The real payoff happens when natural light hits those reflective backsplashes and light-colored cabinets you’ve already chosen. Daylight bounces around and spreads brightness through the whole galley. Your cramped corridor feeling disappears. What you get instead is a kitchen that actually feels open and comfortable, whether you’re cooking alone or having people over.
Vertical Storage: Making Every Inch Count in Galley Kitchens

Galley kitchens feel tight because you’re working with limited floor space. The fix is simple: stop thinking about what’s in front of you and start thinking about what’s above you. Wall space is your best friend in a narrow kitchen, and using it well means you’ll actually have room to work.
Build Up, Not Out
Floor-to-ceiling cabinets might sound expensive, but they’re worth the investment. A basic cabinet that goes all the way up costs between $300 and $800 per unit, depending on materials and whether you go custom or semi-custom. The payoff is real—you get storage space you didn’t have before, and it stops that awkward gap above standard cabinets where dust just collects.
Mix Cabinet and Open Shelving
Cabinets hold things you don’t need to see every day. Open shelves, on the other hand, let you store stuff you actually use while keeping the room from looking like a storage unit. Floating shelves run about $50 to $200 each installed, and they work best when you fill them with things that look decent—your everyday dishes, some cookbooks, a few nice bowls.
Get Your Counters Back
Wall-mounted pot racks free up cabinet space and keep your most-used cookware within arm’s reach. A solid stainless steel rack costs $40 to $150 and saves you from digging through a cabinet every time you need a pan. Just hang it where you can actually grab things without bumping your head.
Organize What You Already Have
The containers and dividers inside your cabinets matter as much as the cabinets themselves. Pull-out drawers ($30 to $80 each) let you see what’s in the back without reaching. OXO containers are reliable and start around $5 to $20 depending on size. A touch-latch door ($15 to $40) closes softly and keeps your cabinet from swinging open on its own.
Thinking vertically isn’t complicated. It just means using the walls you have instead of wishing for more counter space.
Smart Appliance Selection for Narrow Galley Spaces

Choosing the right appliances matters when you’re working with a galley layout. Pick ones that are too big, and you’ll feel squeezed every time you cook. Compact appliances like 18-inch dishwashers and 24-inch depth refrigerators keep your sightlines clear and counter space open. Panel-ready or built-in options blend seamlessly with your cabinetry, which reduces the visual clutter along those narrow runs.
Compact appliances and built-in options keep galley kitchens feeling open and organized, not cramped.
Combination appliances—think microwave-convection units—give you multiple functions without taking up tons of room. These units usually run between $300 and $800, depending on brand and features, and they’re solid performers for smaller kitchens.
When you’re planning where everything goes, keep your work triangle in mind. Position your fridge, sink, and stove so you’re not constantly squeezing past each other. It sounds simple, but it actually makes cooking feel less like an obstacle course.
Choose durable, easy-clean finishes in matching materials across all your units. Stainless steel or matte black finishes work well because they hide fingerprints and look neat without much effort. This cohesive approach makes your galley feel organized and purposeful, not cramped.
Cabinet Organization Systems That Function Daily

Once you’ve got your appliances positioned correctly, the real work happens inside your cabinets. Good cabinet organization systems make cooking feel less like a treasure hunt.
Deepest drawers work well for OXO containers—they stack neatly and keep everyday ingredients right where you need them. You’ll spend less time searching when everything has a designated spot.
Wall-hung cabinet positioned left of your oven holds pantry staples within arm’s reach during cooking. This placement cuts down on extra steps when you’re in the middle of preparing a meal.
Drawer dividers keep spices lay-flat and visible. No more digging through a jumbled pile to find cinnamon or cumin.
Pull-forward appliance positioning keeps your Zojirushi accessible without letting steam damage nearby areas. Heat rises toward upper cabinets, so keeping small appliances forward prevents moisture buildup on surrounding items.
Baking supplies deserve their own lower drawer where you can easily reach flour, sugar, and baking powder without climbing. Upper cabinets benefit from lazy Susans for oils and vinegars—they cost around $10-20 and let you spin to what you need. Add risers so canned goods stay visible instead of sliding to the back.
These strategies mean you’re working with your kitchen layout rather than against it. That’s the real advantage of a galley kitchen: nothing’s far away, so every tool and ingredient can be exactly where you need it.
The Kitchen Triangle: Position Your Sink, Stove, and Fridge

How’d you like to cut your kitchen steps in half? Your sink, stove, and refrigerator are the three workzones that matter most in a galley kitchen. Position these three close together, and you’ll dramatically reduce unnecessary walking.
Start by placing your refrigerator at one end to bookend your cabinetry. This creates a natural starting point and anchors your layout. Keep your sink and stove relatively near each other with continuous counter space between them for prepping. This setup lets you move smoothly from washing ingredients to cooking without backtracking.
Make sure your aisle width accommodates two people comfortably. Nobody wants to squeeze past someone mid-chop, and a tight walkway turns cooking into an awkward dance. When you align everything thoughtfully, your galley kitchen works better, making daily cooking feel less like a workout.
Galley Kitchen Counter Space: Pull-Outs and Floating Shelves

In a galley kitchen, counter space is genuinely limited, so you need smart storage solutions that work hard. Pull-out drawers positioned under your countertops or beside appliances let you store everyday items like OXO containers, utensils, and small appliances without eating up your actual work surface. These drawers slide out smoothly when you need something and tuck away when you’re cooking or prepping food.
Floating shelves mounted above your counter offer another layer of storage. You can display your favorite cups and plates up there while keeping bulkier items hidden in cabinets below. The result is a workspace that stays clean and clear because your most-used things are easy to grab without crowding the counter itself.
The combination works because pull-out drawers handle the everyday clutter, while floating shelves add vertical storage without taking up floor space. You’re essentially working within the footprint you’ve got while still keeping things organized and within reach. It’s practical and keeps your workspace functional where it actually matters—where you prepare meals.
Pull-Out Drawer Efficiency
Ever notice how the best galley kitchens aren’t the biggest ones—they’re the ones where everything’s exactly where you need it. Pull-out drawers do a lot of the work by keeping your storage organized and your counter space open.
What pull-out drawers actually do for you
When you add pull-out drawers, you’re making it easier to reach things without knocking stuff over or digging around. No more bending into dark cabinets or stacking things so high they tumble down when you open the door.
Getting organized with smart placement
Position pull-out drawers next to the spots where you cook or prepare food most. If you feed a cat, a pull-out drawer right there means you grab food and a bowl without crossing your whole kitchen. For supplies you use constantly, like OXO containers or baking pans, install them in lower drawers so they’re at eye level when you squat down. Tall cabinets work well for pull-out racks holding cleaning supplies, which keeps your counters from looking cluttered.
The real payoff
The whole point is spending less time hunting for things and more time actually cooking. A galley kitchen with pull-out drawers works with you instead of against you. You know where stuff is, you can reach it quickly, and your small space doesn’t feel cramped because nothing piles up on the counter.
Floating Shelf Solutions
Floating shelves solve a real problem in smaller kitchens: you need storage, but your counter space is already tight. By going vertical, you keep your work areas clear while displaying the things you actually use—like your favorite cups or serving dishes.
The basic approach works like this. Mount shelves on your walls, and suddenly you have accessible storage that doesn’t take up floor or counter real estate. Pair open shelving with pull-out organizers, and you can fit more stuff in the same footprint. A brass rail attached to a floating shelf also doubles as extra counter space when you need it for chopping vegetables or prepping meals. This setup keeps your workflow smooth in a narrow kitchen.
Where you place these shelves matters. Putting them above your work zones means you can grab what you need without walking across the room. Storing items you use daily on easy-to-reach shelves beats digging through cabinets. Just keep in mind that open shelves show dust and spills more easily, so choose what you display with that reality in mind.
Pantry Organization and Dry Goods Storage in Compact Kitchens

Smart pantry organization matters when you’re working with limited galley kitchen space. You want to use every inch wisely, and good planning gets you there.
Smart pantry organization maximizes limited galley kitchen space—every inch counts when you plan wisely.
Start by installing a wall-hung cabinet to the left of your oven. This gives you concentrated pantry access without eating up your counter space. Deep drawers with OXO containers (usually $15-$30 per set) work well for storing flours, sugars, and other dry goods because they’re sized to fit standard pantry items and stack neatly.
A dedicated spice drawer with a lay-flat design keeps your daily seasonings organized and within arm’s reach when you’re cooking. You could also use a spice rack that attaches to the inside of a cabinet door, which costs around $10-$25 and doesn’t take up drawer space at all.
For your lower drawers, reserve space specifically for baking supplies like pans and racks. This keeps them separate from your everyday cooking tools and makes them easier to grab when you need them.
In your upper cabinets, lazy Susans (about $8-$15) work well for oils and vinegars since you can spin them to find what you need without moving everything around. Add risers or tiered shelving to stack canned goods vertically instead of horizontally, which doubles your storage capacity without adding shelves.
Clear labels on containers help you spot what you need quickly. Whether you use a label maker or write on masking tape, taking a few seconds to mark items saves you time when you’re cooking. This kind of setup makes your compact kitchen feel organized and functional, so cooking actually becomes something you want to do.
Unifying Materials and Colors to Make Galleys Feel Larger

When you’re working with a narrow galley kitchen, pick one color family and stick with it everywhere—soft whites, warm creams, or pale grays work well across your cabinets, countertops, and walls. This creates a unified look that doesn’t break up the space visually.
The real trick is extending the same countertop material and flooring from your living room or dining area into the kitchen. It sounds simple, but it actually erases the visual boundaries that make a space feel cramped and closed off. You’re basically telling your eye that the kitchen is part of a bigger area, even if it’s not.
Top this off with reflective surfaces like glossy subway tiles for your backsplash—brands like Emser or Daltile offer basic versions in the $5-8 per square foot range—and add under-cabinet lighting (LED strip lights run about $15-40 depending on length). These details bounce light around and make the space feel noticeably more open than its actual square footage.
Monochromatic Color Schemes
How’d you like your galley to feel twice as wide without knocking down walls?
A monochromatic color scheme does a lot of heavy lifting here. By choosing light cabinetry paired with a single countertop material, you’ll create a cohesive palette that tricks the eye into seeing more space. The key is keeping everything in the same color family so your eye doesn’t stop and start at different spots.
Light cabinets work best when they match or coordinate with your countertops. When everything flows together without visual breaks, the whole kitchen feels bigger. Uniform hardware finishes help too—stick with one metal tone like brushed nickel or matte black throughout. Integrated appliances that blend in with your cabinetry add to this seamless look without costing a fortune.
Texture matters more than you’d think in a monochromatic kitchen. A subtle wood grain on cabinets paired with a textured countertop like leather granite keeps things from feeling flat and boring. The texture adds interest without creating visual clutter.
If you’re running a backsplash, let it go all the way up to the ceiling. This draws the eye upward and makes the galley feel taller. Matching or coordinating your backsplash material with your overall palette strengthens that unified feeling.
The real advantage here is that you’re not fighting against your galley’s tight layout. Instead, you’re working with it. Light bounces around better when there aren’t competing colors breaking things up. Your kitchen ends up feeling intentional and well-planned rather than cramped.
Continuous Material Flow
The trick to making your galley kitchen feel bigger isn’t about adding more stuff—it’s about creating one long visual line that your eye can follow without stopping. Choose the same flooring material from your living room straight into the kitchen. This erases visual breaks and makes the whole area feel connected. Concrete, large-format tiles, or vinyl planks in the same color work well because they don’t interrupt your sightline.
Use uniform countertop surfaces and finishes across all zones. Quartz countertops (usually $40 to $100 per square foot installed) give you that seamless, edge-to-edge look without visible seams that break up the space. Pair matching cabinetry in the same wood tone or finish—whether that’s warm oak, cool gray, or natural walnut—so your eyes travel smoothly across the whole kitchen without stopping at different colored sections.
A cohesive palette across cabinetry, countertops, and backsplashes creates transitions that make narrow spaces feel wider. If your cabinet is soft white, your countertop could be white or pale gray, and your backsplash could repeat that same light palette or add a subtle texture in the same color family.
| Strategy | Benefit | Example |
|---|---|---|
| Extended Flooring | Uninterrupted sightlines | Concrete or large tiles throughout |
| Uniform Countertops | Continuous surfaces | Quartz ($40–$100 per sq. ft.) |
| Matching Cabinetry | Visual cohesion | Same wood tone or finish |
When everything flows together, you’re building a kitchen that actually feels larger and more inviting. Your eye doesn’t get stuck on color changes or material shifts, so the whole space reads as one connected area rather than a bunch of separate zones squeezed together.
Reflective Surface Integration
Now that you’ve created visual flow with matching materials, it’s time to bring in light itself—and reflective surfaces will help your galley feel bigger than it actually is.
You’ll want to strategically layer reflective elements throughout your galley to bounce light and expand the space. Start with glossy backsplashes or light-colored cabinetry that maximize light reflection and visually widen narrow walls. Patterned subway tiles with a semi-gloss finish (around $5-8 per square foot) work well if you want something more interesting than plain white.
Pairing white or light cabinetry with darker countertops creates depth while keeping everything bright and uncluttered. Think quartz or dark laminate counters that contrast with your cabinet color. Add glass-front cabinets or open shelving on one wall to reduce visual heaviness and catch natural light. This approach works especially well if you stock those shelves with everyday items—bowls, glasses, cookbooks—rather than leaving them empty and sparse.
Incorporate metallic hardware and mirrored accents that bounce both natural and artificial light along both walls. Brushed nickel or chrome handles (typically $2-6 per piece) are budget-friendly upgrades that catch light without looking too shiny. Small mirrored tiles or a narrow mirror strip on one wall can bounce light back into the space without making things feel cluttered.
These reflective surfaces work together, creating a cohesive design that feels open and welcoming.
Glass Doors and Open Shelving: Creating Openness Without Removing Walls

Want to make your galley kitchen feel bigger without knocking down walls? Glass doors and open shelving actually work well together for this. Installing glass doors on upper cabinets lets light bounce around your space, which makes it feel wider than it actually is. You get to show off your favorite dishes and glassware while keeping the stuff you’d rather hide tucked away in lower cabinets.
Open shelving mixed with closed cabinetry gives you the best of both worlds. Items you use every day stay right where you can grab them, while clutter disappears behind solid doors. This balance keeps your narrow kitchen from looking messy or overwhelming.
The real trick is picking glass and transparent elements that match your color palette. When your dishes, glasses, and cabinet colors coordinate with each other, the whole space feels calmer and more put-together. Shelving positioned along the length of your kitchen naturally draws your eyes from one end to the other, which actually makes the space feel less cramped and brighter overall.
Avoid These 5 Common Galley Kitchen Design Mistakes

How can you avoid turning your galley kitchen into a cramped, poorly lit maze? You’re not alone in facing these challenges. Let’s look at the five mistakes that trip up most galley kitchen designs.
Ignoring aisle clearance — Keep at least 42 inches of clear space between opposing counters so two people can move comfortably without bumping elbows. This might sound like a lot, but once you’re both trying to open the fridge and the oven at the same time, you’ll understand why it matters.
Skimping on lighting — Layer in under-cabinet task lights, ceiling fixtures, and pendants to brighten up that tunnel-like darkness that makes cooking feel claustrophobic. Under-cabinet LED strips like the Philips Hue system (around $80 to $150) clip under shelves and let you see what you’re chopping. Pair these with a simple ceiling fixture and maybe a couple of pendant lights over the counter, and your galley suddenly feels less like a basement.
Installing short cabinets — Cabinets that don’t reach the ceiling waste valuable vertical storage and create awkward dead zones above. Full-height cabinetry gives you room to stack dishes, appliances, or anything else you need to stash away.
Mixing too many materials — Stick with a cohesive color palette and minimal patterns to keep your galley kitchen layout feeling unified rather than chaotic. Two or three coordinating finishes work far better than five different wood tones and three different backsplash styles fighting for attention.
Real-World Galley Kitchen Layouts That Work for Daily Life

Once you’ve dodged those common pitfalls, you’re ready to see how real kitchens actually work day-to-day. The best galley layouts create distinct workflow zones where you prep on one side and cook on the other. You’ll want your sink and stove together, with the fridge anchoring the end—this setup keeps you moving efficiently without backtracking.
| Zone | Location | Purpose |
|---|---|---|
| Prep Area | One wall | Cutting and assembling ingredients |
| Cooking Zone | Opposite wall | Stove and immediate cooking tasks |
| Storage | Floor-to-ceiling | Deep drawers and pull-out organizers |
Smart storage solutions like deep drawers and pull-out organizers minimize clutter and keep things within arm’s reach. Consider brands like Rev-A-Shelf, which makes pull-out drawer systems starting around $80 to $200 depending on size. These organizers fit inside existing cabinets and let you see everything without digging around.
Lighting matters more than you might think in a narrow kitchen. Under-cabinet LED strips (brands like Philips Hue or basic options from hardware stores around $30 to $60) brighten your work surfaces and make the space feel bigger. Pair them with light-colored cabinetry in soft whites or pale grays, which reflects light and prevents the galley from feeling cramped.
Keep at least 42 inches of aisle width so two people can work comfortably together without constantly saying “excuse me.” This measurement matters because it’s the difference between a functional kitchen and one where you’re always turning sideways to let someone pass.