
You’ll want a clear epoxy topcoat for indoor garages because it deepens the color and adds shine. However, if your garage gets direct sunlight, polyaspartic or polyurea coatings work better since they resist yellowing over time.
Before you apply anything, run a moisture test. Seal a plastic bag flat on your floor and leave it there for two days. If you see condensation underneath, you need a moisture barrier first. These run about $30–$80 per gallon and prevent blistering down the road, which costs way more to fix.
When you’re ready to apply the topcoat, brush or roll it in one direction. This simple habit keeps you from getting lap lines where overlapping strokes create visible marks. It sounds basic, but getting the prep work right actually saves you from headaches later.
What Is an Epoxy Garage Floor and Why It Needs Protection
Durability is the main reason people choose epoxy garage floors, and there’s real logic behind it. You get a tough, resin-based coating that sticks to your concrete and handles whatever lands on it—tire marks, dropped tools, spilled oil. It’s built to take a beating.
But even tough surfaces have weak spots. Moisture that sneaks under the concrete slab can cause blistering or make your coating peel away. Chemicals and regular foot traffic gradually wear down the finish too. Without proper sealing, you’ll end up with stains, pitting, and a coating that fails before its time.
That’s where maintenance comes in. A quality sealer protects your investment and keeps your floor looking sharp for years. Most homeowners who seal their epoxy floors spend between $1 to $3 per square foot on sealer products—a small cost compared to recoating an entire floor later. Think of it like this: a little upkeep now saves you from bigger, more expensive fixes down the road.
Why Your Epoxy Floor Needs a Topcoat Sealer
 1")
Why does your epoxy floor need extra protection on top of what’s already there. Think of a topcoat sealer as your epoxy’s backup plan—it’s the extra layer that keeps your investment looking good longer.
Your epoxy handles the basics, but a topcoat adds serious scratch resistance and UV stability that epoxy alone can’t quite manage. You’ll notice the difference when you’re moving tools around or when sunlight streams through your garage door.
Here’s the thing: moisture is sneaky. It can creep underneath your epoxy and cause blistering or adhesion problems. A quality topcoat sealer blocks that moisture vapor transmission before it becomes a headache. You’ll also spend less time cleaning since that easy-to-maintain surface is the topcoat working for you every single day.
Clear Epoxy Topcoats: Maximum Gloss and Durability
 2")
When you apply a clear epoxy topcoat over your base layer, the colors underneath become richer and more vibrant while the whole surface gets that showroom shine. Beyond looks, you’re also strengthening your floor’s defenses against chemicals and everyday wear. Your garage floor can handle the spills, tire marks, and foot traffic that come with real life.
If you’re worried about sunlight fading everything over time, a quality clear epoxy topcoat gives you solid UV protection. Polyurea options can take that protection even further if you need maximum durability in a bright garage. The trade-off is usually cost—polyurea runs higher than standard epoxy, but it lasts longer and holds its clarity better under intense sun.
Enhancing Color And Shine
If you’ve ever run your hand across a freshly sealed epoxy floor, you know that glass-like smoothness is real. Clear topcoats do two things at once: they deepen your floor’s color and give you that glossy finish. They stick to epoxy bases really well, which means no peeling and no hassles down the road.
| Topcoat Type | UV Stability | Best For |
|---|---|---|
| Clear Epoxy | Good | Indoor garages |
| Polyaspartic | Excellent | Sunny spaces |
| Polyurea | Superior | High-traffic areas |
Your choice depends on where your garage sits. If your space gets a lot of sun, polyaspartic and polyurea topcoats hold their shine better and won’t fade as quickly as basic clear epoxy. Indoor garages do fine with standard clear epoxy since they don’t deal with constant UV rays.
The trick is patience. Your base layer needs time to cure completely before you brush on any topcoat, or you’ll end up with adhesion problems. Once you get it right, your garage will look like it came straight from a professional installer.
Chemical And Wear Resistance
Beyond that showroom shine, your floor has to handle real life. A clear topcoat does way more than look good—it protects your surface from spills, solvents, tire marks, and tool drops.
Epoxy by itself won’t hold up long-term. You need a clear topcoat layer on top of your base epoxy that adds serious chemical resistance. This extra shield keeps gasoline, oil, and harsh cleaners from damaging your floor’s surface.
The bonus is that your clear topcoat strengthens how well everything sticks together while also protecting against daily wear. You’re basically building a protective layer that keeps your floor looking fresh and working well for years to come.
UV-Resistant Topcoat Sealers: Polyurea vs. Polyaspartic
 3")
When you’re picking between two topcoat sealers that both shield against UV damage, the real difference comes down to how they work and what matters most to you.
Polyurea cures in 12 to 24 hours, which means you can park your car or walk on the floor pretty quickly. That speed matters if you can’t afford weeks of waiting around. Polyaspartic takes longer to cure but handles UV rays differently—it resists yellowing and color fading much better over time, especially if your garage sits in direct sunlight all day.
Think about what your garage actually gets. If sunshine pours in through windows or garage doors regularly, polyaspartic’s superior UV resistance keeps colors looking fresher for years. The trade-off is patience. Polyurea forgives minor moisture issues during application, making it easier to apply if conditions aren’t perfect. Both products block UV damage, but polyaspartic simply holds its appearance longer.
Your decision comes down to one thing: do you want to use the space faster, or do you want the coating to look better a few years down the road.
Do You Need a Moisture Barrier Under Your Epoxy?
 4")
You might think epoxy alone can handle your garage floor, but moisture sitting underneath the concrete can turn that investment into a peeling mess. The smart first step is testing your slab using something like the plastic bag test to figure out if you actually have a moisture problem.
If your testing shows moisture or a high vapor emission rate, you’ll need to apply a dedicated moisture barrier before the epoxy goes down. This barrier blocks moisture from below and stops blistering and adhesion failures later on. Think of it as protective insurance for your floor. Even if your tests come back clean, adding a moisture barrier still makes sense—it’s a small extra investment that many garage owners feel good about, since it gives them peace of mind without costing too much more.
Testing For Moisture Presence
Before you apply epoxy to that garage floor, you need to know what’s hiding underneath. Moisture trapped beneath your slab can damage even quality epoxy coatings, leading to blistering and failure within months.
Here’s a straightforward test you can do yourself. Seal a plastic bag to your floor with duct tape and leave it there for two days. If moisture builds up inside the bag, you have a moisture problem that needs fixing before any epoxy goes down.
This simple check tells you whether you need a moisture barrier. If you find rising moisture or have a high water table on your property, you’ll want to use a moisture-sealing epoxy system rather than a standard penetrating sealer. A product like Rust-Oleum EpoxyShield (around $30-50 per gallon) is designed to handle these conditions better than basic options.
Skipping the moisture test leads to floors that fail within a few months instead of lasting years. Catching moisture problems early saves you from ripping out failed epoxy and starting over, which costs far more in time and money than getting it right the first time.
Moisture Mitigation Layer Benefits
That plastic bag test you just ran tells you whether moisture‘s creeping up from below. If it is, putting epoxy straight on your slab is risky business. A moisture mitigation layer sits between your concrete and your coating, blocking water vapor before it can cause problems like blistering, disbondment, and adhesion failure.
You might not need one, though. If your moisture testing shows the slab is fairly dry and in decent condition, a penetrating sealer by itself could work fine. But in wet climates or where the water table sits close to your garage, that mitigation layer becomes pretty valuable. The real difference shows up over time—a coating with a proper barrier lasts years, while one without it might fail in just a few months.
The smart approach is straightforward: test first, install your barrier second, then apply your epoxy. This order matters because you’re protecting your investment before anything goes wrong. Products like Rust-Oleum Concrete Primer or Sherwin-Williams moisture barriers run between $30 and $80 per gallon, depending on coverage and your location, and they typically dry in 24 to 48 hours before you can coat over them.
When Barriers Are Essential
Do you really need a moisture barrier, or can you skip it and save a few bucks? It depends on your slab’s moisture levels.
Start with moisture testing. The plastic bag test works well—seal a bag to your floor for two days and check for condensation. If you see moisture, you’re installing a barrier. Traditional sealers won’t do the job because they’re not designed to handle wet slabs.
You’ll want a barrier if your slab shows any of these signs:
- Moisture detected during the plastic bag test
- The slab is in a basement or below-grade space
- Water drains poorly around your garage
- You’ve noticed dampness or white powder (efflorescence) before
- You’re planning to use epoxy for the long haul
Skip the barrier only if your slab stays completely dry year-round. Otherwise, go with a moisture-sealing epoxy system. You’ll prevent blistering, adhesion failures, and expensive repairs down the road. The upfront cost pays for itself when you avoid ripping out a failed coating later.
Choosing the Right Epoxy Floor Sealer for Your Needs
 5")
When you’re standing in your garage looking at that freshly applied epoxy, you might think you’re done—but you’re really only halfway there. Your next decision is picking a topcoat, and it matters more than you’d expect.
If your garage gets blasted by sunlight, you’ll want UV resistance. A polyaspartic clear coat (typically $30-60 per gallon) handles this well and keeps yellowing from turning your floor into a time capsule of neglect. For moisture concerns, applying a moisture barrier underneath prevents blistering before it starts. Standard epoxy clear coats offer solid protection, while penetrating sealers protect without changing how your floor looks—though they won’t work with every epoxy system.
Here’s where people trip up: compatibility. Test your chosen sealer with your epoxy before committing to the whole floor. Follow cure times religiously, even though waiting feels pointless. Proper prep work—cleaning, grinding, repairing cracks—makes everything perform better. Skip this step and you’re just hoping for the best.
Prep Your Floor: Moisture Testing and Concrete Preparation
 6")
Before you open that epoxy can, you need to know what’s hiding in your concrete. Moisture is the sneaky culprit that ruins most epoxy jobs, so testing for it isn’t optional if you want results that actually stick around.
The plastic bag test is your starting point. Seal a plastic bag flat against your floor with tape and leave it there for two days. If condensation shows up underneath, water is moving through your concrete and you’ll need to fix that before applying epoxy.
Getting your concrete ready involves several steps. Clean everything off first—dirt, dust, and loose debris all have to go. For a residential floor, diamond grinding smooths the surface and opens up the concrete so epoxy can grip properly. Commercial and industrial spaces usually need shot blasting, which is more aggressive. Any cracks or damaged spots get patched. If moisture testing showed problems, install a moisture-control barrier before moving forward.
Skipping this prep work leads to blistering and peeling epoxy within months. The work feels tedious, but it’s the difference between a floor that lasts and one you’ll regret spending money on.
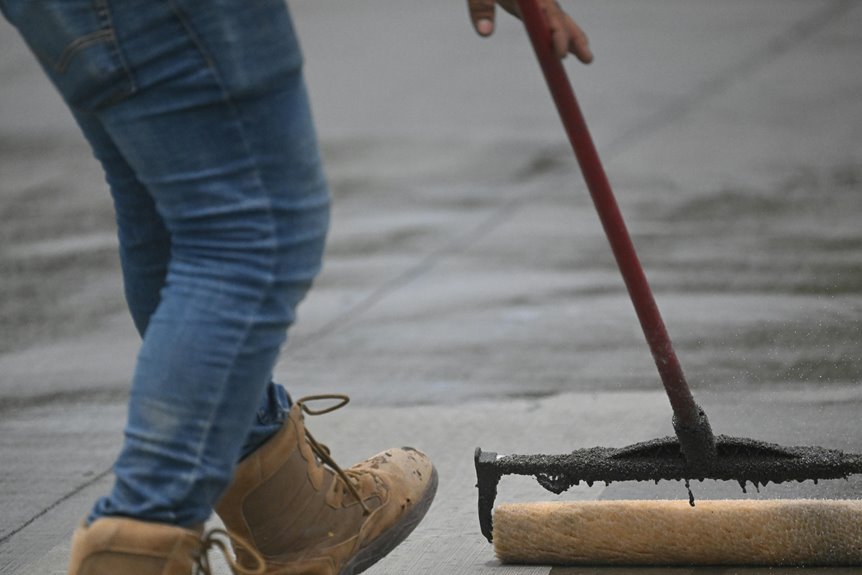
Applying a Clear Topcoat Without Lap Lines
 7")
How’s your epoxy looking so far?
Now comes the fun part—sealing it properly. You’ll want a clear topcoat that’s compatible with your epoxy base to prevent peeling. The trick is applying it in one consistent direction. This keeps those annoying lap lines from showing up and ruining your hard work.
Maintain uniform thickness by following the coverage rate, typically around 200 square feet per gallon on smooth floors. Thin, even coats beat one heavy coat every time. If you go too thick, you’re basically just asking for lap lines to appear anyway.
Timing matters. Wait the manufacturer’s recommended interval, usually 8–12 hours, before your second coat. Don’t exceed that window or you’ll actually invite lap lines back in.
For sunlit garages, consider polyaspartic clear coats over epoxy topcoats. They cure faster and handle UV better while still giving you that nice gloss finish. You’ll find brands like Rust-Oleum Professional and Sherwin-Williams ProClassic in the $40–$80 per gallon range, depending on your coverage needs.
Pitfalls That Sabotage Sealer Performance and How to Avoid Them
 8")
You’ve put in the work to apply your epoxy, so don’t let a few common mistakes undo everything now. The biggest culprits that tank sealer performance are skipping moisture testing, using incompatible topcoats, neglecting surface prep, applying the wrong sealer type, and ignoring existing moisture issues.
Moisture testing isn’t optional. Without it, you’ll risk blistering and adhesion failure down the road. This is one of those steps that feels like busywork until you skip it and watch your coating bubble up six months later. A basic moisture meter costs between $30 and $100 and takes minutes to use—worth every penny compared to ripping everything out and starting over.
Match your sealer specifically to your epoxy system. Mismatched products cause peeling and yellowing because they don’t bond properly to each other. If you used an epoxy base, check what topcoat the manufacturer recommends. A UV-stable polyaspartic topcoat won’t stick to dirty concrete, and it won’t adhere well to the wrong epoxy either.
Don’t rush surface prep. Clean, grind, and repair cracks thoroughly before you seal anything. Dirt, dust, and loose concrete prevent coatings from bonding, and small cracks become big problems once moisture gets underneath. Use a concrete grinder on rough spots and fill cracks with an epoxy crack filler appropriate for your climate.
Address moisture problems first, then seal. If your concrete stays damp or you have standing water issues, a penetrating sealer won’t solve the problem—you need a moisture barrier instead. These steps aren’t tedious. They’re the difference between a coating that lasts five years and one that lasts fifteen.