
Engineered hardwood flooring combines a real wood veneer on top with a multi-ply plywood base underneath. This construction gives you the look and feel of solid wood while handling moisture way better—which matters if you’re installing in kitchens, bathrooms, basements, or over concrete slabs where solid hardwood would absorb water and buckle.
The plywood core makes engineered flooring more stable than solid wood, so it resists warping and cupping when humidity changes. You also get more flexibility with how you install it. You can float it over a subfloor, glue it down, or nail it—pick whatever works best for your space and your comfort level with installation. Upfront costs run lower than solid hardwood too, which is nice if you’re working with a budget.
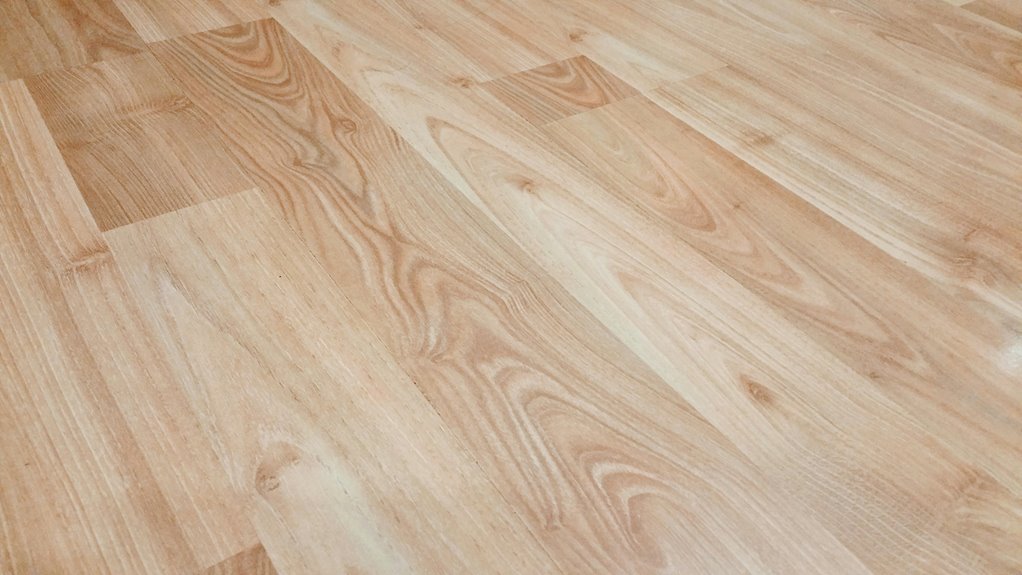
When picking a species, think about how much traffic the room gets. Hickory handles kitchen wear and tear well because it’s tough and hides scratches. White oak works nicely in living rooms and bedrooms where foot traffic stays lighter. Look for a wear layer at least 4mm thick if you want the flooring to last for years and have the option to refinish it later when it gets scuffed up. Thinner wear layers don’t give you that flexibility, so it’s worth spending a bit more for that durability buffer.
What Is Engineered Hardwood Flooring?
Ever wonder why engineered hardwood has become so popular for home floors? It’s actually pretty smart construction. You’re getting a real wood veneer on top—that’s your wear layer, typically 2 to 6 mm thick. Underneath sits a multi-layered core made from plywood or hardwood, usually 9 to 11 plies stacked at right angles to each other.
This design gives you serious moisture resistance and stability that solid hardwood can’t match. The thicker your wear layer, the more times you can refinish it down the road. So if you go with a 6 mm wear layer instead of 2 mm, you’re looking at several more refinishing opportunities over the life of your floor.
You’ll find engineered hardwood works in basements, kitchens, living rooms, and other spaces where solid wood might struggle with humidity changes. Installation is flexible too—you can glue it down, nail it, or float it over a subfloor. It’s basically solid wood’s practical cousin, built to handle real-world conditions without the fussiness.
How Engineered Flooring Differs From Solid Hardwood
Now that you understand how engineered hardwood’s layered design works, you might be wondering how it actually stacks up against traditional solid hardwood.
| Feature | Engineered Flooring | Solid Hardwood |
|---|---|---|
| Construction | Layered with veneer top | Single wood piece |
| Moisture Resistance | Excellent | Limited |
| Installation | Glue, nail, or floating | Primarily nailed/glued |
| Refinishing | Depends on wear layer thickness | Multiple sandings possible |
Engineered flooring’s layered construction gives you moisture resistance that solid hardwood can’t match. This stability really matters in kitchens, bathrooms, basements, and anywhere humidity changes throughout the year. If you live somewhere with four seasons or just generally damp conditions, engineered flooring handles those swings without warping or cupping the way solid hardwood might.
The thickness of your wear layer determines how many times you can refinish the floor. A thicker wear layer—say 4mm or more—lets you sand and restain multiple times, sometimes three or four cycles depending on the product. Thinner wear layers, around 2-3mm, might only allow one or two refinishings. This matters if you plan to keep your flooring for decades.
Installation gives you real flexibility too. You’re not locked into one method like you are with solid hardwood. With engineered flooring, you can nail it down, glue it, or use a floating system where planks click together without fasteners. This flexibility actually makes installation easier and faster, which can save on labor costs.
Engineered flooring delivers the wood look you want while often costing less than solid hardwood. You also get the benefit of using sustainably harvested materials, since the veneer top is a real wood species while the core uses responsibly managed plywood or high-density fiberboard.
What Makes Engineered Flooring Durable: Construction Layers

When you’re shopping for engineered flooring, what lies beneath that hardwood surface matters just as much as what you see. The core is built from 9 to 11 layers of plywood, with each layer rotated 90 degrees. This cross-grain construction keeps the wood layers from working against each other, which prevents warping when humidity and temperature change throughout your home.
On top of that plywood base sits a real hardwood veneer, typically about 4mm thick. Here’s where a choice comes up: dry-sawn versions give you a thicker wear layer compared to rotary-peeled options. That extra thickness means you can refinish your floors later without running out of material to work with.
Veneer And Core Structure
What’s actually holding your engineered flooring together? It’s the combo of veneer and core construction working as a team. Your veneer thickness—usually 4mm—sits on top of a sturdy multi-layer plywood core that’s 9 to 11 plies deep. Those core layers alternate direction at 90° angles, which seriously reduces warping and keeps everything stable.
The veneer comes in two main types. Dry-sawn veneer gives you a thicker wear layer, meaning you can refinish your floor more times over its lifetime. Rotary-peeled veneer costs less upfront but creates a thinner surface layer, so it won’t last quite as long for refinishing. The multi-ply core underneath handles moisture really well—especially helpful if you’ve got underfloor heating running beneath your floors.
Here’s what matters most: make sure that core stays thicker than your veneer. Check whether you’re getting dry-sawn or rotary-peeled veneer, because that choice directly impacts how long your floor actually lasts. The cross-grain orientation of those core layers gives you moisture resistance and dimensional stability, so your floor won’t cup or warp as easily.
| Feature | Benefit |
|---|---|
| Dry-sawn veneer | Thicker wear layer, longer refinishing life |
| Rotary-peeled veneer | Cost-effective, thinner surface |
| Multi-ply core | Moisture resistance and stability |
| Cross-grain orientation | Reduced warping and dimensional stability |
Plywood Backing Stability System
The real secret to engineered flooring’s durability isn’t just what you see on top—it’s what’s hiding underneath. Your plywood backing system is the unsung hero that keeps everything stable and strong.
Each layer of plywood gets turned 90 degrees from the one below it. This cross-layer construction creates a balanced, warp-resistant foundation that actually stays put. Think of it like building a brick wall where you alternate which direction the bricks run—it’s just sturdier that way.
A multi-ply substrate with 9 or 11 layers distributes the stress your floor experiences evenly across the whole surface. More layers mean better support, which is why thicker core designs can handle multiple sandings over the years without damaging the veneer on top.
Engineered flooring handles moisture way better than solid hardwood. This makes it perfect for basements, kitchens, or rooms sitting on concrete slabs where traditional hardwood would cup and buckle. If you’ve ever had water problems in a basement, you know why this matters.
You’re paying for flooring that performs in real homes, not just in showrooms. That’s the actual engineering difference—a floor built to handle what actually happens in your space.
Engineered Flooring Wear Layer: Thickness and Lifespan

When you’re picking out engineered flooring, the wear layer’s thickness is what determines how long your floor actually lasts and how many times you can refinish it. You’ll find options ranging from thinner 3 mm layers to thicker 6 mm wear layers in premium ranges.
Here’s the practical difference: a 3 mm wear layer won’t handle much sanding before you’ve used up the refinishing potential. A 6 mm layer lets you refinish multiple times and keep your floor looking decent for decades. Think of thickness as an investment in your floor’s future. Thinner layers save you money upfront but might leave you stuck when scratches and wear start showing up and you can’t sand them out anymore.
The choice between them usually comes down to your situation. If you’re installing flooring in a high-traffic area like a kitchen or entryway, the thicker 6 mm option makes sense even though it costs more initially. If you’re looking at a bedroom or living room with lighter use, a 4 mm or 5 mm layer can work fine and keeps your budget lower. Mid-range engineered flooring typically sits around $3 to $8 per square foot with a 4 mm to 5 mm wear layer, while premium options with 6 mm layers run $8 to $15 per square foot.
Thickness Standards And Durability
How thick is the wear layer on your engineered wood flooring. It sounds like a boring detail, but it actually matters quite a bit. A thicker layer means your floors will last longer and handle more wear before they need replacing.
Wear layer thickness varies quite a lot depending on what you buy. Dry-sawn veneers go up to 3/16 of an inch, which is pretty thick and lets you refinish the floor multiple times over the years. Luxury engineered options use 6mm wear layers for maximum durability. Standard engineered floors usually sit around 4mm, giving you a decent balance between how they look and how long they’ll last. Rotary-peeled options come in at around 2mm, which limits how many times you can refinish them down the road.
The reason thickness matters is stability. Thicker wear layers resist moisture better and work with the core layers underneath—usually 9-ply or 11-ply construction—to prevent warping when humidity changes. When you’re shopping, actually check the thickness on your sample. Don’t just trust what the packaging says. That number directly affects whether you’re refinishing your floors in 15 years or 30 years.
Sanding Potential And Refinishing
Now that you know how thick your wear layer is, let’s look at what you can actually do with it when your floors start showing signs of use. How many times you can sand and refinish depends almost entirely on that veneer thickness.
A 6 mm wear layer—the kind you get with luxury planks—gives you room to refinish multiple times over your floor’s life. The thinner 3 mm options limit you more. Dry-sawn veneers up to 3/16 inch handle aggressive sanding better than rotary-peeled versions, which matters if you need to remove deeper scratches or stains.
The core structure underneath matters too. It keeps everything stable during refinishing so you don’t accidentally sand through to the base or create dips in the surface. Thicker wear layers mean you could refinish your floors several times before you’d actually need to replace them, which extends the life of your investment considerably.
Select Your Wood Species by Room and Traffic

Why does your kitchen need different flooring than your bedroom? Because the wood you pick should handle what that room actually does.
Think about where you spend your time most and what happens there. High-traffic areas need tougher wood species that won’t show dents and wear as quickly.
Kitchens and entryways get the most action, so hickory makes sense. It resists dents better than softer woods and handles the daily foot traffic without complaining. Living rooms work well with white oak, which accepts custom stains nicely if you want to change the look down the road. Bedrooms and offices can use lighter species since fewer people walk through them. These lighter options still hold up fine and brighten the room at the same time.
Moisture-prone areas like bathrooms near showers need hickory’s extra toughness to handle humidity without swelling or warping as much.
Your wood choice affects both how the floor looks and how long it lasts. White oak works in formal living spaces where appearance matters more. Hickory handles your family’s daily life without needing constant care.
The simple rule: match your engineered wood to how you actually use each room. Kitchens get hickory. Living rooms get white oak. Bedrooms and offices get lighter species. When your flooring fits what the room does, your floors stay looking good for years.
Moisture Resistance: Where Engineered Flooring Excels

Engineered flooring’s layered construction is built to handle moisture way better than solid hardwood. When humidity spikes in your bathroom or kitchen, those multiple layers work together to prevent the warping and cupping that solid wood can’t resist. Think of it like a protective shield—the core layers stay stable even when moisture levels shift around, which makes engineered flooring a practical choice for basements, kitchens, or any space where concrete slabs sit underneath.
Because of this stability, engineered flooring can go in places where solid hardwood would buckle and fail. You get the look of real hardwood without the headache of dealing with moisture damage in damp environments. The layers distribute moisture stress evenly across the board instead of letting one layer absorb all the impact, which is why it performs so reliably in slightly damp spaces.
Layered Construction Reduces Warping
You’re getting a real wood veneer on top bonded to a multi-ply core underneath. Think of it like a sandwich—each layer does something specific.
The layers work by being placed at right angles to each other. This cross-grain setup creates stability that fights swelling and keeps the wood from cupping or buckling. A multi-ply core absorbs moisture more evenly than solid wood would, which matters when humidity changes from season to season. The plywood base underneath also handles moisture better than traditional hardwood bases, so your floors stay flatter even when conditions get damp.
This engineered design tackles warping at its source. You won’t get the same movement problems that solid hardwood floors have in basements or kitchens, where moisture tends to be higher. That’s the real benefit here—moisture resistance is built right into the structure, not added on as an afterthought.
Performance In High-Humidity Environments
Where does engineered flooring really shine? In your basement or anywhere moisture loves to lurk. The multi-layer plywood core keeps your floors stable when humidity spikes—something solid hardwood simply can’t handle because it swells and shifts with moisture changes. That smart design is what makes engineered wood work better in damp spaces.
Quality options typically have a wear layer of 4mm or thicker, which protects against moisture damage while holding up through refinishing. This construction also lets you install engineered flooring over concrete slabs, where traditional wood would buckle and warp from the moisture underneath.
Keep in mind that engineered flooring isn’t waterproof, so you’ll still want to wipe up spills quickly. But compared to solid wood, you’re getting genuine peace of mind. Your basement deserves flooring that actually works there.
Stability Above Concrete Slabs
Why does engineered flooring work so well over concrete when solid hardwood fails? Your concrete slab naturally absorbs moisture, which warps solid wood. Engineered flooring resists this because of how it’s built.
The layers are what really matter. A typical engineered plank has a plywood core with 9–11 backing layers that work together. Each layer runs in a different direction, kind of like how a wooden fence doesn’t split as easily as a solid log. When moisture tries to make the wood cup or bow, all those cross-grain layers push back against each other. Nothing moves dramatically because the stress gets spread out instead of concentrating in one spot.
On top sits a real wood veneer, usually around 4 millimeters thick with a dry-sawn finish. That’s thick enough to sand and refinish a few times over the years, so you’re not just getting real wood beauty—you’re getting flooring that holds up to actual living.
You’ve also got options for how to install it. Glue-down works best when moisture is your biggest concern. Nail-down works over wooden subfloors. Floating installation lets you lay it down without permanent attachment, which is useful if your slab has settling issues. Pick the method that matches what your concrete is actually doing.
This is why engineered flooring belongs in basements and ground-level spaces where solid hardwood simply can’t survive. You’re not making a compromise on looks. You’re getting real wood with a construction that actually handles what a concrete slab throws at it.
Engineered Flooring Installation: Floating, Glued, or Nailed?

Once you’ve picked out your engineered flooring, the real decision comes down to how you’ll install it—and honestly, this choice matters more than you might think.
You’ve got three main installation methods to consider, each with distinct advantages. Floating installations use click-lock systems and don’t require fasteners, making them ideal for DIY enthusiasts and folks working with concrete subfloors on a tighter budget. Glue-down applications provide stability and a solid feel, which works particularly well if you’re dealing with concrete slabs. Nail-down options work best over wooden subfloors with thicker constructions, and they tend to last longer in high-traffic areas.
| Installation Method | Best For |
|---|---|
| Floating | Concrete, budget-conscious installers, DIY projects |
| Glue-down | Stability, concrete slabs |
| Nail-down | Wooden subfloors, longevity, high-traffic areas |
Your choice affects warranty coverage and future refinishing options, so verify specifics with manufacturers before committing. A floating installation might be easier to handle yourself on a Saturday afternoon, but glue-down flooring gives you more stability if you have pets or tend to move heavy furniture around regularly. Nail-down flooring requires more skill and equipment, but many people find the permanent feel worth the extra effort.
Engineered Flooring Veneers: Dry Sawn vs. Rotary Peeled

Now that you’ve settled on an installation method, it’s time to look closer at what’s actually on top of that plywood base. The veneer you choose will shape how your floors look and perform over the years.
You’ve got two main options. Dry sawn veneers offer thicker wear layers—up to 3/16 inch—with wider widths and wood grain that matches solid hardwood. Rotary peeled veneers are thinner at about 2 mm and create a plywood-like appearance instead. The trade-off is real: dry sawn flooring sands and refinishes multiple times, extending lifespan significantly. Rotary peeled options cost less upfront but may develop moisture issues faster.
When you’re sampling floors, ask your retailer which veneer method they’re using. Check the grain pattern and heartwood details too. Look at the finish quality while you’re at it—a good finish protects the veneer from daily wear and spills. This information helps you pick floors that’ll match your home’s style and your actual budget, not some imaginary one.
How Wear Layer Thickness Affects Refinishing Costs Later

That thin veneer on top of your engineered flooring is basically your floor’s insurance policy. The thickness of your wear layer—that’s the real wood surface you actually walk on—determines how many times professionals can sand and refinish it before they hit the core underneath.
Here’s the practical difference: a 6mm wear layer gives you substantially more refinishing potential than a 3mm layer. If you refinish every 10 to 15 years, a thicker wear layer means you might get three or four refinishing jobs out of your floor. A thin one might only handle one or two before you’re looking at replacement costs instead. A standard refinishing job runs anywhere from $1.50 to $4 per square foot depending on your location and the contractor, so those extra refinishing cycles add up to real savings.
Wear layers created through dry-sawn methods tend to be thicker and more durable than veneer produced other ways. They hold up better to repeated sanding. When you’re comparing engineered flooring options, checking that wear layer thickness matters more than picking a specific brand name. Look at the actual millimeter measurement on the product spec sheet—it’s one of the few numbers that directly connects to your wallet years down the road. A floor with a substantial wear layer simply costs less to maintain over its lifetime, which is why this detail deserves real attention when you’re making your choice.
Verify Your Engineered Flooring: CARB2 and Manufacturing

When you’re picking out engineered flooring, checking whether it’s CARB2 compliant is something you’ll want to do before buying. This certification means your flooring meets strict indoor air quality standards and keeps harmful VOC (volatile organic compound) levels low enough to be safe in your home.
Before you commit to a purchase, verify these details:
- CARB2 compliance status on the product documentation or manufacturer’s website
- Where the flooring is manufactured and whether it meets local environmental rules
- VOC levels in the technical specs—these numbers tell you what the flooring actually releases into your air
- Real-space testing if possible, so you know what emissions will actually happen in your home
Ask manufacturers directly about where they make their flooring. Local sourcing typically means lower environmental impact and that domestic standards apply to what you’re buying. Marketing claims on boxes are nice, but actual test results matter more. Request documentation from the manufacturer rather than taking their word for it. Your lungs will appreciate the extra step of verifying this information before you decide.
Daily Care and Long-Term Maintenance

Keeping your engineered flooring in good shape doesn’t require much work. Start with regular sweeping or vacuuming to get rid of dirt, then use a damp mop with a mild cleaner made specifically for engineered wood. Steer clear of harsh chemicals since they’ll eat away at your wear layer and finish.
Rugs and mats in high-traffic spots help reduce daily wear and tear. When spills happen—and they will—wipe them up right away to prevent stains and moisture problems, especially in kitchens and entryways where floors take more abuse.
For long-term care, products like Treatex Hardwax Oil bring back your floor’s shine and strengthen it over time. The cost runs around $30-$50 per liter depending on where you shop. Just follow what the manufacturer recommends, since applying it correctly makes a real difference in how well it works. These straightforward steps keep your engineered flooring looking fresh for years without much fuss.
Warning Signs of Poor Quality

Just because engineered flooring costs less than solid hardwood doesn’t mean you should grab the cheapest option available. A lower price tag can hide real problems, so it helps to know what to look for when you’re comparing products.
A wear layer that’s 2 mm or thinner is a major red flag. Once that thin protective surface wears down, you can’t sand and refinish it the way you can with solid wood. That means your floor will show damage faster and won’t last as long overall.
The core of the plank matters just as much as the top layer. If a board has only one or two layers underneath the veneer, it won’t handle humidity changes well. Wood naturally expands and contracts with moisture, and a weak core lets the plank cup and shift around instead of staying flat and stable.
How the veneer gets made also tells you something about durability. Rotary-peeled veneers are super thin and plywood-like, which means they soak up moisture easily. That’s a sign the flooring might not hold up well over time in kitchens, bathrooms, or other damp areas.
Check whether the manufacturer has certifications like CARB2 or VOC compliance. These show that the products meet standards for safety and indoor air quality. If a quote doesn’t mention these, the company might be cutting corners on how it makes the flooring.
Before you buy, also compare the plank dimensions across different batches and products. When specifications are vague or all over the place, it usually means the manufacturer isn’t being careful about consistency. Ask specific questions about thickness, core construction, and certifications. You’re putting down money for something that will be in your home for years, so it’s worth getting clear answers.